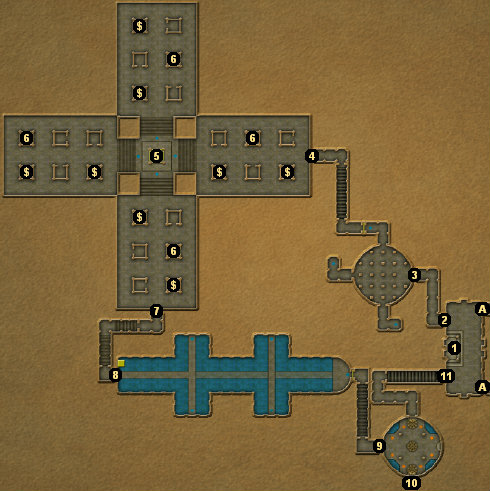
This Guide is an overview of an area in the Elven Lands for Dungeon Lords. It’s made up of a map, map legend, and overview of the varying points of interest.
Area Note
The Trial of the Ancient Elders is attached to the House of Lords in Arindale. You’ll have to take the trial after you’ve started the Way of the Tiger quest (from the House of the Tiger), and after you’ve accused House Fathien of stealing the  Argalia armor. Completing the trial will apparently prove the veracity of your words.
Note: There is sort of an annoying bug in the last trial (#9), and so it’s a good idea to save your game before entering the trial. You might also need the saved game in case the trial is too difficult for your character. We’d recommend reaching level 8 first.
Another Note: In MMXII, the elders are level 80, and they’re almost impossible to hit with physical attacks. So unless you’re playing a quality caster of some sort, we’d recommend skipping the elders and just moving through the trial quickly.
Overview
1 – Lord Galebriand
You’ll need to talk to Lord Galebriand before and after the trial. After the trial he should give you Galebriand’s letter, which will allow you to enter Ulm.
2 – Trial Entrance
3 – The Pillar Trial
In this first trial, you’ll find a bunch of broken pillars, plus three ledges to the south, west, and north. The idea in this area is to climb up onto the pillars and then jump to the three ledges. You’ll only be able to reach the southern ledge at first, but in the alcove behind it you’ll find a blue pressure plate, and when you step on it, a pillar in the area will lower, allowing you to access the western ledge. Then in the western alcove, you’ll find another blue pressure plate, and stepping on it will lower another pillar, this one allowing you to jump to the northern ledge where the exit is.
Meanwhile, while you’re doing all of that jumping around, Elder Kyusho (one of the ancient elders) will shoot arrows at you from the ledges. There are two ways to deal with Kyusho. The designers of the trial probably intended that you reach the pillar next to a ledge, battle Kyusho until you knock him back, and then jump onto the ledge, causing him to disappear from that ledge and appear at the next.
That strategy works, but when you reach the pillar next to a ledge, you’ll be close enough to attack Kyusho, but he’ll think you’re too far away for melee attacks and too close for ranged attacks, and so he’ll just stand there, allowing you to whack him. That means, if you want to, you can battle him for 30-40 minutes, whittle away his hit points, and eventually kill him. Kyusho is worth over 600,000 experience, so if you have the patience, it’s definitely worthwhile to kill him.
Note: The only hiccup to the strategy is if you knock Kyusho so far back that he starts attacking you with his bow again. If that happens, drop back down to the floor and then climb up to the pillar again. Kyusho will revert to standing-around mode.
4 – The Cage Trial
In this trial, you’ll find a cage (#5) surrounded by four rooms containing treasure chests. The idea is to open the treasure chests (which are all level 3), find four stones of fours (#6), and then place the stones into the “rune glyphs” next to the cage. That will cause the cage to rise and the door to the south (#7) to open, allowing you to move on to the next trial.
Just like in the previous trial, you’ll be attacked as you try to complete the test. However, instead of one boss attacking you, here you’ll have to deal with continually spawning elven archer spirits and elven knight spirits, as well as a boss banshee. The spirits should be easy enough to kill, but the banshee has about as many hit points as Elder Kyusho, and blocking won’t prevent her spells from hitting you.
If you’re playing a version of Dungeon Lords prior to 1.4, then there’s a trick. If you load your game while in the trial, then the spirits will stop spawning, leaving just you and the banshee. Then if you can get the banshee stuck somewhere (she’s not very smart, and she’ll usually try to walk through the cage rather than around it), you can ping away at her with ranged attacks, eventually defeating her. The banshee has a lot of hit points, but if you stick to it you’ll receive over 300,000 experience when you kill her.
If you’re playing version 1.4/1.5, then the spirits won’t stop spawning when you load your game, and so you won’t be able to get yourself into a one-on-one duel with the banshee. So in that case, we wouldn’t really recommend that you try to kill the banshee, since it would take forever. Still, the archer spirits are worth about 500 experience and the knight spirits about 3000 experience, and so you can just keep killing spirits to make up the “lost” experience from the banshee.
When you’re ready to move on, place the four stones of fours into the rune glyphs. That will cause the banshee to disappear (if she was still around), and that will cause the spirits to stop materializing. If you’re playing the Collector’s Edition, then you’ll find a elven spirit shield in the center of the cage area. Otherwise, the cage area will be completely empty. However, you might need to walk around in the cage area to get the door to the south to open.
5 – Cage
6 – Stone of Fours
7 – Cage Trial Exit
8 – The Walkway Trial
This trial is divided into three stages. Each stage consists of walkways in the shape of a “T.” What you’ll have to do is walk to both ends of the “T” and step on the blue pressure plates there. When you step on a pressure plate, spirits will stop materializing at the plate, and once you’ve stepped on both plates, a walkway will move into position to allow you to advance to the next stage.
The spirits in this trial are exactly the same as the spirits in the previous part, so, once again, if they’re easy for you to kill, you might want to delay stepping on the pressure plates and gain some extra experience first. The only thing you’ll have to worry about is getting knocked off a walkway and into the water. If that happens, there’s a lift next to the entrance to the area, and if you swim over it, it will raise you up to the walkway.
At the third stage of the trial, instead of spirits appearing, an Elder Master will appear. If you don’t want to fight him, then just step onto the blue pressure plate next to the doorway. The elder will disappear and the doorway will open, giving you access to the last part of the trial.
However, this third elder is the easiest to kill. You can just go toe-to-toe with him if you want. You can also knock him into the water and then either try to stand on the extreme edge of a walkway (so that it looks like you’re standing on air) and pelt him with ranged attacks, or you can jump down into the water after him. Apparently, the elder gets confused in the water, and if you have a long enough melee attack, you can attack him without being attacked back. People have also reported success luring him to the lift near the entrance to the area, and then using the gap between the lift and the walkway to confuse him, essentially repeating the strategy from the first trial. Regardless, if you can kill the elder, then you’ll receive over 700,000 experience.
Note: Save your game as soon as you go through the exit door of this trial. The next trial will break if you try to load your game in the middle of it, and so it’s good to have a functioning save to fall back on.
9 – The Fire Spouts Trial
This last trial is the most difficult, simply because you’ll have to fight spirits in it, while in the other trials fighting was optional. Once you enter the room with the fire spouts, spirits will begin to materialize on the three platforms in the room. They’ll appear in waves. In the first few waves, the spirits will appear on all three platforms, but after that they’ll only appear on the middle platform. So as long as you can keep from getting overwhelmed early, you should be able to survive the waves.
Here’s a trick. If you stand on a platform where a spirit is materializing, then the spirit won’t appear. That means you can cut down the number of spirits you’ll have to face from the first few waves, and you can completely prevent spirits from appearing in the later waves.
After the first couple waves, besides the elven archer spirits and the elven knight spirits that you’ve seen before, you’ll also encounter elven master spirits. You’ll recognize them because they’ll cast spells and wield katanas. If this part of the trial is going to go badly for you, it’ll usually happen when the elven masters start appearing. All you can do is try to gut your way through it. Remember to drink potions, cast healing spells, and, as a last resort, revive.
Note: If you’re playing an early version of the game, then loading your game during the trial will prevent the remaining waves of spirits from appearing — and thus break the trial. In that case, you’ll have to go back to a saved game from before entering the fire spouts room. This bug has been corrected in version 1.4/1.5.
But, oh yes, there’s one last thing. While you’re trying to defeat the waves of spirits, you’ll also have to deal with an elven wizard. He’ll jump from ledge to ledge above you and fling fire spells your way. This is generally a bad thing, but if you do a lot of running around in the trial then you can use his spells against him, because they’ll hit the elven spirits as much as they’ll hit you.
Note: If you’re playing version 1.4/1.5 and have the scout skill, then the location of the elven wizard will show up on the minimap. You can use that to your advantage. If you stand right under the wizard, then he won’t be able to hit you with his spells.
The elven wizard is the boss for this trial, and, like the other bosses, he’s optional. About the only way to kill the wizard is to kill him with ranged attacks before the trial officially starts. To do that, creep into the trial room, but don’t go past the two fire spouts next to the entrance. That should get you close enough to hit the wizard with ranged attacks, but not put you so far into the room that you’ll trigger the spirits into materializing.
However, we’ve never heard of a good way to kill the wizard. Apparently, spells work better against him than bows, but the only people we’ve heard from who have killed him say that they spent hours doing it, and they’ve reported that the wizard is worth the least of the trial bosses, and so he doesn’t seem worthwhile to kill.
10 – Elven Spirit Bow (Collector’s Edition)
Be sure to grab the  elven spirit bow before exiting the trial.
11 – Trial Exit
Exits
- Doorway to the foyer of the House of Lords.


