In this guide we’ll show you everything there is to know about the mission at Brahmin Wood, where you’ll eliminate a gang of raiders.
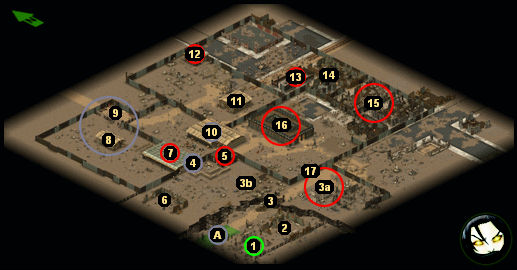
Map
Objectives
- Kill the raider leader (#16).
- (Optional) Rescue the captured tribals (#10).
Walkthrough
You’ll start out in the southwestern corner of the map (#1). You’ll have Farsight (level 1) and Stitch (level 2) with you. As their names imply, Farsight is good with ranged weapons, and Stitch is good at patching people up. That means you might want to redistribute your equipment, to make sure that your character and Farsight get the best weapons, and Stitch gets whatever is left. Since Farsight has some skill with sneaking, you might want to give her the MP5 H&K or the Pump-Action Shotgun and save the Hunting Rifle for your character.
Note: Characters need to be standing right next to each other to transfer equipment.
Your squad will be safe enough until you reach the bridge (#3). Then raiders to the east (#3a) and north (#3b) will attack you. But both raiders will use pistols, so you should be able to snipe at them using the Hunting Rifle and your own pistols. The same strategy should work on the raider in front of the house door (#4). The raider inside the guard shack (#5) is a little bit trickier. You could try to set up an ambush for him, but the raider seemed reluctant to leave the shack when we played. So you can just snipe at him as well by sending the character with the Hunting Rifle directly west of the shack entrance. That character should then have an open shot at the raider, and be pretty safe in return because the raider will try using his low-range Uzi against you. Once the raider in the shack is dead, loot the chest there. Inside you’ll find a house key (needed to open the house door), three Stimpaks, and some 7.62mm ammunition (which you can use in Hunting Rifles).
Continue to snipe away at the raiders as you move counterclockwise through the area. Raiders won’t move far away from their designated patrol areas, and so each firefight should be an isolated event. For the most part, you’ll have access to Hunting Rifles (you can find more at #11 and #13-16) while the raiders will only use pistols, and so you should be able to kill them while taking little damage in return. But if you get banged up, be sure to have Stitch heal you with his First Aid Kit.
You’ll find Horus the raider leader in the big building in the center of the compound (#16). He’ll have four raiders with him, so killing him can be difficult. But just keep your characters near the entrance to the building, and have them retreat outside to heal any time things start going badly. The raiders won’t follow you out.
Once Horus is dead, you’ll earn 600 experience points. Surprisingly, you won’t find a lot of good loot from the final raiders. Horus will drop a Cleaver and another house key (which you can use to open the gate at #17), but otherwise you’ll only find weapons you already have, plus some Stimpaks in the containers in the room.
After the battle, send characters to talk to the village shaman (#6) and the village elder (#2). This is optional, but they’ll be happy to see you, and they’ll give you a Healing Powder and a Detonator. Then just send your squad to the extraction point (Exit A) to end the mission.
Points of Interest
1 – Starting Point
2 – Village Elder
At the end of the mission, the village elder will give you a Detonator.
3 – Bridge
Raiders to the east (#3a) and north (#3b) will attack you when you reach the bridge (#3).
4 – Locked House Door
You can find the house key for the door inside the nearby guard shack (#5).
5 – Guard Shack
6 – Village Shaman
The village shaman will give you a Healing Powder at the end of the mission.
7 – House
In a shelf inside, you can loot three Stimpaks.
8 – Kennel
In a shelf in the kennel you can pick up some Voodoo and two Healing Powders.
9 – Sleeping Enemies
You’ll find two sleeping dogs and one sleeping raider here. Try to sneak up on them and then blast away with burst mode to kill them before they can do anything.
You’ll find several tribals being guarded by a pair of raiders here. If you can kill the raiders without getting any of the tribals killed, then you’ll earn 100 experience points. This is easier than it might appear since the raiders will pretty much ignore the tribals and fire on you instead. So as long as you don’t use burst mode indiscriminately, you should be fine.
Note: Although it is difficult to tell, there are actually two entrances to the tool shed. When you start your assault, it’s best to split up your forces and hit the raiders from two sides.
On a workbench inside the tool shed, you can pick up some melee weapons and a set of Lockpicks.
11 – Shack
One of the raiders at the shack will have a Hunting Rifle. The other will have a Spear Gun.
12 – Guard Shack
Inside you’ll find a single raider plus a crate containing ammunition and three Stimpaks. You’ll need the house key (from #5) to open the doors of the shack.
13 – Bunker
You’ll find four raiders in and around the bunker. This can be a difficult battle because one of the raiders will have a Hunting Rifle, and so you won’t necessarily be able to out-range them. So when you see the raider with the rifle, concentrate on him first, and then mop up the others.
In a crate in the bunker, you can pick up a First Aid Kit and two Incendiary Grenades.
14 – Sniper Post
On this elevated platform, you’ll find raider with a Hunting Rifle. We didn’t have any luck sneaking up on the raider, but if you send a character at him with an SMG or a shotgun, then you should be able to do way more damage to him than he does to you. After the battle, be sure to loot the raider’s rifle and ammunition, including the ammunition in the nearby crate.
15 – Ruins
You’ll find more raiders here, including another one with a Hunting Rifle.
16 – Headquarters
You’ll find three raiders patrolling outside of the headquarters. These guys shouldn’t pose much of a problem for you, although one of them (the one next to the ladder) will use a Hunting Rifle against you.
Inside the headquarters, you’ll run into five raiders, including Horus the raider leader. This can be a tough battle. There are several crates and columns in the room, giving the raiders lots of things to hide behind, and you’ll have to get so close to the raiders that even the ones using low-range weapons will be able to hit you and damage you.
But here are a couple things you can try. The raider closest to the entrance will have an Uzi, but he’ll be facing the back of the room. That means it should be pretty easy to have Farsight sneak in behind him and give him a couple shots from a Pump-Action Shotgun. There is also a wall adjacent to the headquarters entrance. If anybody in your squad gets wounded, just send them behind the wall and heal them there (you might want to leave Stitch crouching there, just for that purpose). The raiders won’t chase you behind that wall. Finally, you can also try sending one of your characters onto the roof to snipe at the raiders from there. That didn’t really work for us, because the character never seemed to get line-of-sight against any of the raiders, and the best we could do was just toss in a couple of grenades and hope for the best.
After the battle, loot all of the bodies in the room, plus the crate and the two chests. Surprisingly, the loot won’t be all that great. You’ll find a Cleaver on Horus, but all the other weapons will be repeats of things you’ve already seen, and the containers will only produce Stimpaks. Horus will also have a second house key, and you can use this one to open the gate to the south (#17).
17 – Gate
You’ll need the house key from Horus (#16) to open this gate.
Exits


