In this guide we’ll show you everything there is to know about the mission at Buena Vista, where you’ll need to disrupt the manufacturing facilities of the robots.
Map
Objectives
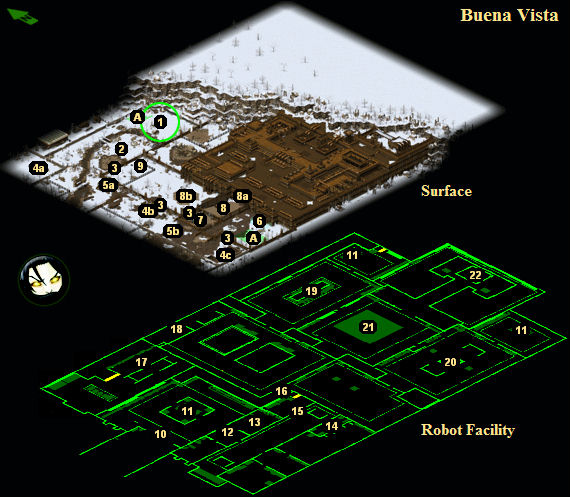
- Shut down or destroy the power plant (#22).
- Destroy the manufacturing facilities (#11).
- (Optional) Learn about and disable the Hellion (#12, #21).
Walkthrough
When you arrive in the area, you’ll discover that something is interfering with your EchoBoy, and so you won’t have a mini-map available at the start of the mission. However, you’ll still be able to use the map feature of your PIPBoy, so you’ll still get to see an overview of the mission area.
Also at the start of the mission, you’ll witness Paladin Lancelot and his squad of Brotherhood soldiers storming the robot facility (#7). They’ll be out of your visual range, so you won’t be able to see or affect what happens, but suffice it to say that they’ll get slaughtered, and so defeating the robots will be up to you.
Your first goal in the mission is to make your way from the drop-off point (#1) to a computer terminal (#4c) that will lower the force barriers protecting the robot facility (#3). You’ll have to destroy a bunch of robots along the way, but that should be easy enough until you reach the behemoth (#6). The behemoth has 1000 hit points, and it can do a lot of damage, but you’ll be able to set up your squad before facing it, and so you should be able to smack it with your best heavy weapons and energy weapons and kill it before it can kill any of your squad.
Inside the robot facility, you’ll have to do a couple things. For the first mission objective, you’ll have to reach the power plant on the far side (#22) and destroy it. That will net you 30,000 experience points. For the second objective, you’ll have to destroy three power nodes (#11). These power nodes aren’t attached to a repair facility like the ones in Canyon City, so they won’t be able to repair themselves once destroyed, and so you can destroy them whenever and however you want. When all three are gone, you’ll receive 15,000 experience points. When both objectives have been met, you’ll receive a bonus of 35,000 experience points, and the two extraction points (Exit A) will appear.
Points of Interest
1 – Starting Position
2 – Pot
You’ll find some .50 Cal ammunition in the pot. You’ll encounter several scurry bots nearby.
3 – Force Barrier
These force barriers are doors, but you won’t be able to open them like a regular doors. You’ll need to flip the switch in the southwestern corner (#4c) to lower them.
4 – Trenches
You’ll find robots in all three of these trenches. The first trench (#4a) will only contain a single humanoid bot with a Flamer. In the second trench (#4b), you’ll find a humanoid bot with some Plasma Grenades. In the final trench (#4c), you’ll encounter two humanoid bots, each with a Sniper Rifle, and you’ll also find a computer terminal. If you click on the terminal, then you’ll lower most of the force barriers on the map (#3).
5 – Bunkers
You’ll encounter four robots in the first bunker (#5a). They’ll have Sniper Rifles and Plasma Rifles, so they’ll be able to hit you at range. The best strategy is to advance on them quickly and take them out with heavy weapons.
In the second bunker (#5b), you’ll have to deal with a pair of humanoid bots wielding a Sunbeam Laser Rifle and a Plasma Rifle.
6 – Behemoth
The force barriers surrounding the behemoth won’t go down at the same time as the other force barriers (#3). They’ll stay up until you approach the remains of Paladin Lancelot’s squad (#7), and then the behemoth will try to surprise you from behind. However, if you know it’s coming, then you can set up your squad in a line facing the behemoth, with your heaviest guns active. The behemoth has 1000 hit points, and it can do a lot of damage with its attacks, so your best strategy with it is to kill it as quickly as possible. We received 2018 experience points for killing the behemoth, and we also found .50 Cal ammunition, Canisters of Acid, Explosive Rockets, and Super Stimpaks on its corpse.
7 – Paladin Lancelot’s Squad
You’ll find five dead warriors and the corpse of Paladin Lancelot here. Chances are, none of them will have equipment that you’ll want to use. You’ll also find a computer terminal here. If you click on it, then you’ll learn that it “looks scientific.” However, it won’t require much of a Science skill to use. We used it with a character with Science 14%, and it worked fine. When you do activate the terminal, it will open the big door leading to the ramp (#8).
8 – Ramp
The ramp is flanked by a pair of chain-link fences. That’s good news, because lasers can pass through the fences, but Explosive Rockets and robots can’t. That means you can sit behind the fences and attack the turret to the east (#8a) and the tank bot and the hover bot to the north (#8b), without taking any damage in return.
9 – Chest
You’ll find three Super Stimpaks, some 12 Gauge EMP Shells, and some 7.62mm ammunition in the chest.
10 – Ambush
When you first enter the robot facility, a bunch of security bots will suddenly appear in the room and attack you. Security bots aren’t too tough, so if you line up your squad and then use one squad member as bait (to run into and then out of the facility), you should be able to kill them quickly.
11 – Power Nodes
You’ll discover three power nodes in the robot facility. These nodes power the robot manufacturing plant, so destroying them will complete the second objective of the mission and net you 15,000 experience points.
Note: These nodes aren’t like the nodes in Canyon City. You don’t need to destroy them simultaneously.
12 – Computer Console
If you click on the computer console, you’ll learn a little bit about the Hellion (#21), and you’ll earn 31,900 experience points.
13 – Initiate Percy
Percy will die when you talk to him. There isn’t any way to save him. You’ll find an M60 and some ammunition on his corpse.
14 – Computer Terminal
Clicking on the terminal will open the locked door to the north (#15).
15 – Locked Door
It isn’t possible to pick the lock on this door. To open it, you’ll need to use the terminal to the south (#14).
16 – Hotspot
From this spot you’ll be able to attack the load lifters in the room to the north, and some security bots in the room to the east.
17 – Security Trap
In this spot, you’ll find an alarm console, a humanoid bot, and a force barrier blocking several security bots. If you don’t kill the humanoid bot right away, then it will run to the console and release the security bots. That sounds bad, but if the security bots don’t get released, then they’ll target you when you try to pass them on the walkway to the north. We found it easier to deal with the security bots straight on, so you might want to let the humanoid bot set off the alarm.
18 – Turret
This is another one of those turrets that goes up and down. It only fires from the up position, and it’s invulnerable from the down position. The trick is that it won’t change position in turn-based mode, so if you start turn-based combat when it’s down, then you’ll be able to walk safely past it if you want.
If you stand on the ledge next to the turret, you might be able to pick off one or both of the robots in the room to the east (#19).
19 – Room
You’ll find two humanoid bots and two turrets in this room. The bots and the turrets will use energy weapons, so you should be able to kill them by out-ranging them. When you reach the eastern side of the room, or perhaps when you get close enough to the power node in the room to the east (#11), six scurry bots will appear in the room to the west, and they’ll start hunting for your squad members.
20 – Room
You’ll encounter four humanoid bots in this room. The easiest way to deal with them is to attack them from the elevated walkway to the west.
21 – Hellion
You’ll find a computer console next to the Hellion. When you click on it, you’ll cause the Hellion’s batteries to start charging, but something will go wrong. Explosions will go off, the door to the east will open, and a half dozen robots will charge at you. If you set up your squad facing the doorway, then you should be able to deal with the robots quickly. But if you have trouble, retreat to the elevated walkway to the west and attack the robots from there.
For blowing open the door and disabling the Hellion, you’ll receive 31,900 experience points.
22 – Power Plant / Turbines
When you destroy the power plant (which will in turn destroy the turbines), two things will happen. You’ll complete the first objective of the mission, which will net you 30,000 experience points, and you’ll remove the interference to your EchoBoy, giving you back your mini-map.
Exits
A – Extraction Points


