Kansas City – Fallout Tactics Mission


In this guide we’ll show you everything there is to know about the mission at Kansas City, where you’ll need to protect some ghouls from assaulting super mutants.


Map

fallout tactics walkthrough kansascity

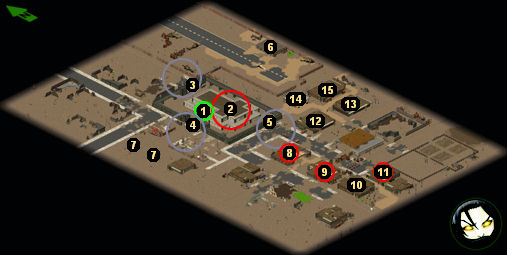
Points of Interest

  1. Starting Point
  2. Cathedral / Bishop Defcon
  3. Northern Gate
  4. Western Gate
  5. Southern Gate
  6. Airport
  7. Mutants on Towers
  8. Commander’s Building
  9. Commander’s Building
  10. Building
  11. Commander’s Building
  12. Building
  13. Building
  14. Building
  15. Building

Objectives

  • Protect Bishop Defcon (#2).
  • Defend the cathedral (#2).
  • Kill the mutant commanders (#8, #9, #11).

Walkthrough

This mission starts out with sort of a fun mini-game. You’ll find yourself in a ghoul cathedral (#1) with a mutant attack imminent. The idea is to protect the ghouls, and especially Bishop Defcon (#2), as much as possible during the attack. So you might want to save your game immediately after hearing the mission briefing, and then try out different strategies for the defense. See if you can keep all of the ghouls alive (it’s tough since the ghouls aren’t very bright).

The cathedral has three gates (#3-5). You’ll start out near the western gate (#1). Most of the attacks will come from the south and west, so you should send most of your squad to those gates and maybe send one squad member to the northern gate. Most of the attacking mutants will use melee weapons, and shotgun or machine gun bursts should tear them up pretty effectively. What you’ll have to be careful about are the mutants with the M249 SAWs and the Avenger MiniGuns. Try to target them first, and only worry about the melee guys when they get close.

You’ll know when the mutant assault has been thwarted because your objectives will update at that point. So don’t start moving around your squad when you think a gate has been secured. Wait until the assault is over. At that point you should heal your squad members and loot the dead. Don’t forget to loot any dead ghouls around. Some might have sniper rifles. But the best loot is likely to be on the super mutants, where you’ll find lots of ammunition and heavy guns. You should also take the opportunity to speak with Bishop (#2), who will give you some Rad-X.

Note: The mission briefing mentions radiation in the area. Perhaps the nuke (#2) is supposed to be radioactive, but it never contaminated any of our squad members.

After defeating the mutant assault, you’ll just need to mop up any remaining mutants on the map. In particular, you’ll need to kill three mutant commanders (#8, #9, #11), but the commanders won’t be any more difficult than regular mutants, and so nothing on the map should cause you too many problems.

Once you’ve completed the “protect Bishop” objective by killing every last mutant on the map, you’ll just need to go back and talk to Bishop (#2) again. That will trigger the exit grid to appear on the map (all along the outer edge), allowing you to head back to your favorite bunker.

1 – Starting Point

2 – Cathedral / Bishop Defcon

If you talk to Bishop Defcon enough times, he’ll give you some Rad-X. “Can I have a hallenneutron?”

3 – Northern Gate

This gate will be defended by land mines as well as ghouls. Feel free to disarm and keep the mines after the battle.

4 – Western Gate

In a crate next to this gate you can pick up some T86 Acid Sprayers.

5 – Southern Gate

This is where the biggest assault will take place. You should place half of your squad here to fend off the mutants.

6 – Airport

In this building you’ll find shelves containing a Tommy Gun and some medical supplies.

7 – Mutants on Towers

You’ll find mutants on both of the towers here. One will have a Browning M2, and the other will have a Rocket Launcher. They’ll both be facing the cathedral (#2), so it should be easy to sneak up the ladders behind them. Killing the mutants in turn-based mode can be tough, since they’ll both be in overwatch mode, but in continuous turn-based mode, your burst attacks should cause massive damage and disrupt their attacks, giving you a good chance of killing them without them ever getting a shot off.

8 – Commander’s Building

The northern side of this building has a lot of gaps between the planks, and so you can park your squad to the northwest of the building and take pot shots through the gaps to kill the commander. There’s a good chance the commander will never see you and never fight back. Attacking the commander will cause the other two mutants in the room to drop down to the ground. To kill them, just enter the building and hit them with grenades. That will cause them to stand up, and allow you to blast them away.

You’ll earn 2000 experience points for killing the commander, and you can find ammunition, frag grenades, and a Laser Pistol on the bodies and in the lockers in the room.

9 – Commander’s Building

You’ll find a commander and two regular super mutants in this building. The easiest way to deal with them is to hit them at range through the doorway on the western side. For killing the commander, you’ll receive 2000 experience points. You can also pick up some useful loot in the room: a 7.62 FN FAL from an ice chest, a pair of Neostead Combat Shotguns and some ammunition from the floor (in the corner next to the ice chest), and a First Aid Book from a shelf.

10 – Building

Inside this building you’ll find a shelf with a Big Book of Science in it.

11 – Commander’s Building

You’ll find a commander and two regular mutants in this building. Chances are, killing the guards outside the building will cause the mutants inside to duck down behind their sandbags. So when you go in, you’ll need to toss grenades at them to get them to stand up. If this is your third commander, then you’ll receive 5000 experience for completing the objective. Also in the room, you can loot a Pancor Jackhammer, some ammunition, and some medical supplies from a trio of chests.

12 – Building

You’ll discover three ghoul corpses here. If you loot their bodies, then you’ll find a Neostead Combat Shotgun, a pair of Stimpaks, some ammunition, and some ring pulls.

13 – Building

In a metal shelf in this building you can pick up three Super Stimpaks.

14 – Building

You’ll find two metal shelves in this building. From them you can pick up some drugs, some ammunition, and some frag grenades.

15 – Building

You can pick up another Big Book of Science from the shelf in this building.

Share this guide:
Steven Carter
Steven Carter

Starting with cassette tape games on the TRS-80, Steven has been playing, creating, and writing about games for a long, long time. This makes him experienced, not old. Lately, Steven has been focusing on walkthroughs, making sure everybody knows how to solve Towers of Hanoi puzzles.

Articles: 469

Leave a Reply

Your email address will not be published. Required fields are marked *