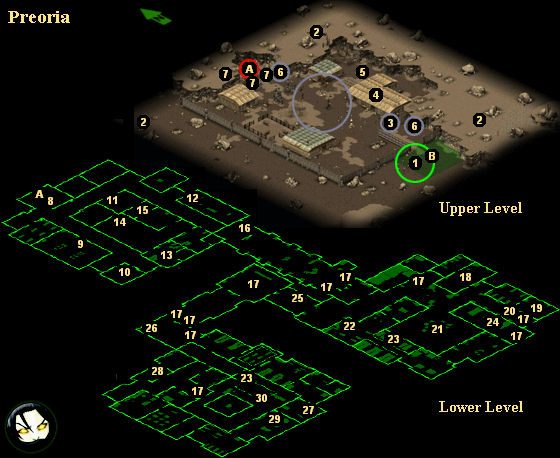
In this guide we’ll show you everything there is to know about the mission at Preoria, where you’ll have to battle radscorpions and cockroaches, plus a few turrets.
Map
Objectives
- Obtain at least three Fusion Batteries (#15, #23).
- (Optional) Keep all of the tribals alive.
Walkthrough
Note: You can become irradiated during this mission. You’ll find some Rad-X and RadAway as you play, but you might want to stock up on those drugs before arriving, just to be safe.
You’ll start out next to the village (#1). The tribals who live there are friendly, so don’t shoot them. If you feel the need for some action, then explore outside the village. You’ll find three sets of corpses there (#2), guarded by some roving radscorpions. The corpses contain better loot than you might except, including a Scout Handbook, two Poison Antidotes (good if you get hit by the radscorpions), a Punch Gun, and a P220 Sig Sauer.
The main part of the mission takes place under the village, in a facility accessed via the staircase on the northern side of the map (Exit A). The facility is home to a bunch of radscorpions and cockroaches, and you’ll generally be fighting them in close quarters, so shotguns and SMGs are better for this mission than Hunting Rifles.
Cockroaches and radscorpions are pretty easy opponents. At worst you’ll get poisoned a few times, but you should find plenty of Poison Antidotes as you make your way through the facility.
The real danger comes from the turrets, both on the surface (#7) and underground (#17). Turrets are resistant to many types of damage (don’t bother trying to snipe at them with Hunting Rifles, for example) but they are vulnerable to powered melee attacks. Better yet, their aim is similar to what you see for rifles, where the closer you get, the worse their aim is, and so if you get right next to them for melee attacks, they’ll miss you more than they’ll hit. So if you want to plan ahead for this mission, you should pick up some Rippers or Power Fists (available for sale inside the bunkers), plus a bunch of Small Energy Cells to power them.
Your goal in the mission is to pick up three Fusion Batteries (#15, #23). As you might expect, you’ll have to completely explore the underground facility to find them all. The only tricky bit in the mission comes at #25. At that point you’ll have to flip a switch to open some of the underground doors, but doing so will also activate the surface turrets. However, turrets act a little funky in turn-based mode, and if you enter that mode before flipping the switch, then the turrets will never activate, and you’ll never have a problem with them. Generally speaking, turn-based mode allows you bypass all of the turrets in the mission, making it much easier.
Collecting all three Fusion Batteries will net you 450 experience points. Once you’ve done that, you should return to the tribal elder (#3). If you kept all of the tribals alive, then he’ll give you a fourth Fusion Battery, and you’ll earn 150 extra experience points.
Points of Interest
1 – Starting Point
2 – Corpses
There are three sets of corpses outside the village. Provided you can beat off the prowling radscorpions, you’ll find some nice equipment on those corpses, including a Scout Handbook, two Poison Antidotes, a Punch Gun, and a P220 Sig Sauer.
3 – Chevron the Elder
4 – Tent
Inside the tent you’ll find some RadAway in a chest.
5 – Dhal the Shaman
Dhal will give you some Rad-X if you talk to him.
6 – Ladders
The ladders lead up to the plateau east of the village. You can find two sets of corpses (#2) up there.
7 – Turrets
Your actions in the underground facility can activate these turrets, causing them to rise up and attack any squad members or NPCs within range. If you don’t care about the tribals in the village, then this is no big deal. But if you want to keep the tribals alive, then you’ll need to be careful how you flip switches underground (see #25), or else you’ll need to park three of your squad members next to the turrets, so the turrets attack them rather than the tribals. The turrets have terrible aim against targets right next to them, and so your decoys shouldn’t take much damage.
8 – Corpses
You can find some Tiger Claws on the corpses here.
9 – Ice Chest
You can pick up a Super Stimpak from the ice chest here.
10 – Shelves and Fridge
You’ll find a yellow pass key on the shelves. You’ll need the pass key for the storage room (#15). Inside the fridge you can pick up RadAway and a Poison Antidote.
11 – Desk
Inside the desk you’ll find a Big Book of Science.
12 – Locker
Inside the locker you’ll find RadAway and Buffout.
13 – Desk
Inside the desk you’ll find a copy of Guns and Bullets, plus a Fantasy Ball.
14 – Desk
Inside the desk you’ll find a copy of Zen & Art of Piloting.
15 – Storage Room
The storage room starts out locked. You can pick the lock if you have a high enough Lockpick skill (35% seems to be enough), or you can use the yellow pass key (#10, #18) to unlock the door.
Inside the storage room you’ll find some lockers and a safe. The lockers contain some useful items, like three sets of Rad-X, plus one of the Fusion Batteries for the main objective. The safe needs to be picked, but inside you can pick up a Big Book of Science, a 44 M29 Revolver, and some ammunition.
16 – Switch
Clicking on the switch will turn on the power in the facility, but it will also turn on the turrets (#17), which will go hostile towards you. You’ll need to have the power on to go through the door to the south, and you can’t turn the power off once it’s been turned on, so you’ll just have to take the good with the bad here.
17 – Turrets
Turrets do not have great accuracy if you get right next to them, so if you have weapons like a Ripper or a Power Fist or even a Neostead Combat SG, then you can take out the turrets, given enough patience and ammunition. Each turret will drop over 600 Micro Fusion Cells.
If you don’t want to deal with the turrets, then just switch to a turn-based (TB) mode. If you leave your game in continuous turn-based (CTB) mode, then the turrets will activate (rise) and deactivate (lower) at regular intervals, but if you use TB mode, then they won’t move, and so if they start out deactivated then they’ll remain deactivated, and you won’t have anything to fear from them
18 – Medical Bay
You can find a bunch of useful medical supplies in the medical bay, including First Aid Kits, a Doctor’s Bag, and a First Aid Book. You can also find another yellow pass key here. Note that some items can be found on the tables.
19 – Locked Office
The office is locked with a yellow door, which can be opened with a yellow pass key (#10, #18). Inside the office you’ll find a trapped desk that contains Leather Armour Mark II plus some other odds and ends.
20 – Locker
This locker contains some pretty good loot: a Casull Revolver, an M16A1 (which has better stats than the Hunting Rifle, but doesn’t seem to work as well), and some ammunition.
21 – Conference Room
On a table here you can pick up a Fantasy Ball, a Mace Glove, and a Deco-Filament.
22 – Workbench
On the workbench you’ll find a Crowbar, a Plunger, and a Micro Sledge.
23 – Lockers
In these two lockers you can pick up two of the Fusion Batteries required for the main objective.
24 – Switch
This is another power switch. You’ll need to flip this switch to get through the door leading to the switch at #25.
25 – Switch
This switch will redirect the facility’s power from its internal to its external defenses. That makes it sound like all of the internal turrets (#17) will shut down, and all of the external turrets (#7) will come online. But that’s not what happens. The surface turrets will come online, but the only thing that will happen internally is that all of the doors leading to the final part of the facility will open up, allowing you to pass. You’ll still have to deal with the turrets.
Fortunately, it will take 10 seconds for the external turrets to warm up. That means, if you leave one squad member next to the switch, you can rush a few of your other squad members through the doors and into the final part of the facility, and then have the remaining squad member flip the switch again to preserve the tribals on the surface. If you enter TB mode before flipping the switch, then the external turrets will never activate, and you’ll just need to make sure that the turrets leading to the final part of the facility are deactivated (in their down position) before you rush past them.
Note: If you haven’t done so already, it’s a good idea to have your squad members take Rad-X before heading into the final part of the facility.
26 – Lockers
Inside these three lockers you can find an M16A1 plus some ammunition.
27 – Shelf
You’ll find a few things in this shelf, including some 5.56mm ammunition and a Cat’s Paw Magazine.
28 – Lockers
Inside the two lockers here, you can pick up a trio of M-14 Rifles, plus other odds and ends.
29 – Lockers and Shelf
You’ll find two lockers and a shelf here. The shelf is trapped. Between the three containers you’ll uncover an Electronic Lockpick and a copy of Maddock’s Tricks & Traps.
30 – Roach Battle
In this room you’ll have to battle a few of the big cockroaches, plus a special cockroach named Roachor. However, Roachor is sort of broken, and he’ll get stuck in the part of the map where he starts out. Since Roacher also only has melee attacks, that means you can stand at range and shoot him with impunity, making the battle pretty easy.
Exits
A – Stairs into Facility


