In this guide we’ll show you everything there is to know about the mission at St. Louis, where you’ll need to take on super mutants while rescuing your allies.
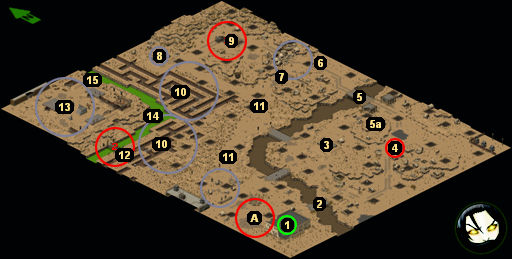
Map
Objectives
- Locate any surviving soldiers (#9).
- Evacuate the soldiers (Exit A).
Walkthrough
You’ll start out in the southwestern corner of the map (#1). As soon as you finish listening to the mission briefing, you’ll witness General Barnaky being captured by the super mutants. You can’t do anything about that yet, so investigate the immediate surroundings. You’ll find a workbench containing two Tool Kits, a copy of Zen & Art of Piloting, and two copies of Deans Electronics. You should also notice an APC. This is what you’ll need for evacuating the stranded soldiers. The APC is a tough vehicle, and you can use it to protect your troops while dealing with the super mutants, but if the APC is destroyed then you’ll lose the mission. So don’t be reckless with it, and keep track of how many Tool Kits you have remaining.
That being said, load your squad into the APC and head east over the bridge (#2). You’ll encounter four mutants guarding the bridge. Three of them will be using M249 SAWs, powerful heavy weapons that use the same ammo as Hunting Rifles and AK47s, and the fourth will have a large supply of Frag Grenades. Just drive up to the mutants and blast them away, and then liberate their weapons and give them to any squad members who can use them effectively.
If you continue along the road, you’ll come to the remains of Fang Squad, plus three of the super mutants who killed them. The same strategy should work here as at the bridge. The only difference is that one of the super mutants will have a Rocket Launcher this time, and so you should target that one first. When you get close enough to the remains, your objectives will update, and you’ll be ordered to look for the next set of survivors (#9).
Note: You’ll find a Sniper Rifle in an abandoned bunker nearby (#3).
To get to the next set of potential survivors, you’ll need to cross the bridge to the north (#5). Once again there will be four mutants guarding the bridge, but this time they’ll be assisted by a Rocket Launcher and some land mines. So you can’t just drive up to the mutants like before, or else you’ll probably lose your APC.
Instead, you should sneak a couple of squad members into the plateau next to the bridge (#5a). There you’ll find the mutant with the rocket launcher. He’ll be watching the road, making it easy for you to sneak in right behind him. If your initial attacks don’t kill him outright, then he’ll probably kill himself when he turns around to fire a rocket at you. With the rocket launcher out of the equation, dealing with the other mutants shouldn’t be too difficult. Just be sure to target the one chucking grenades first, and be careful not to drive too close to the bridge, or you might hit a land mine.
After some more fighting, you’ll find Talon Squad in the northeastern part of the map (#9). You’ll have to heal the three anonymous soldiers in the squad (Paladin Solo will be healthy enough), and that will require at least one use of a Doctor’s Bag on each. If you need medical supplies for this, you can find some in the nearby bunker (#8). Once the soldiers are healed, they’ll supposedly move into the APC, but really they’ll just disappear from the map, and you’ll receive 2000 experience points. To finish rescuing the soldiers, you’ll need to drive the APC to the extraction point (Exit A). You’ll receive 5000 experience points when you get close enough.
The mutant base in the northwestern corner of the map (#13) is optional. If you pick up the two Sniper Rifles available in the mission (#3, #7), then you can put your snipers into the APC, drive over the trenches (#10), and chip away at the base. But if you decide to actually send you squad members inside, you’ll probably have to do a lot of saving and loading, and all you’ll find inside the base are more of the same weapons you found outside the base.
So attack the base as much as you’d like, and then drive to APC to the extraction point (Exit A) to finish the mission.
Points of Interest
1 – Starting Point
Here you’ll find a workbench containing two Tool Kits, a copy of Zen & Art of Piloting, and two copies of Deans Electronics. You’ll also find an APC here.
2 – Guarded Bridge
Four super mutants will be guarding this bridge.
3 – Abandoned Bunker
Inside the bunker you’ll find a trapped chest with a Sniper Rifle inside.
4 – Fang Squad
At this spot you’ll find the remains of Fang Squad — plus three super mutants. If you loot all of the bodies, you’ll find a Rocket Launcher, a few M249 SAWs, a pair of M60s, and some other odds and ends.
5 – Guarded Bridge
You’ll find four more super mutants guarding this bridge. However, this time one of the mutants will have a Rocket Launcher, and you’ll also have to deal with land mines, so driving right up to the mutants isn’t a great idea. For best results, sneak a couple of squad members up onto the plateau next to the bridge (#5a). The ladder leading up to it is near where Fang Squad got killed (#4). You’ll find the Rocket Launcher mutant up there. If you move in right behind him, then chances are when he fires at you he’ll also hit himself, making him pretty easy to kill. With that mutant dispatched, the other three shouldn’t pose much of a problem. Just be careful not to drive too close to the bridge until you’ve disarmed the mines.
6 – Mutants
You’ll find two super mutants with Rocket Launchers here.
7 – Dead Soldiers
You’ll discover three dead soldiers on the ground here, plus a handful of mutants up on the plateaus waiting to ambush you. You’ll only find Stimpaks on the soldiers, but one of the mutants on the plateau to the south will have a Sniper Rifle.
8 – Bunker
Inside this bunker you’ll find a super mutant with a Rocket Launcher. You’ll also find a chest filled with medical supplies. You might need to use the medical supplies on Talon Squad nearby (#9).
9 – Talon Squad
You’ll find Paladin Solo and three other members of Talon Squad here. To meet the first objective, you’ll need to heal the three anonymous soldiers, which will require at least one use of a Doctor’s Bag on each. If you need medical supplies for this, you can find some in the bunker to the west (#8). Once the soldiers are healed, they’ll move into the APC, although they won’t take up any room or fight for you in the upcoming battles. To finish rescuing the soldiers, you’ll need to drive the APC to the extraction point (Exit A). You’ll receive 5000 experience points when you get close enough.
10 – Trenches
You’ll find a whole bunch of mutants in the trenches surrounding the mutant base (#13). The best way to deal with them is to pack your squad into the APC and drive the APC over the trenches. As long as you drive the APC perpendicular to the trenches, it will span the gaps, and you’ll get great angles against the mutants.
Once the mutants are dead, send out a squad member or two to collect the loot. You’ll find a couple of Browning M2s among the dead. The Browning M2 is one of the best weapons in the game, but it’s heavy (it requires 9 ST), and it uses semi-rare .50 Cal ammunition, so you might not be able to use it for a while.
Note: If you have a couple of characters with Sniper Rifles (#3, #7) in the APC when you clear out the trenches, then you’ll probably do a decent job of clearing out the mutant base (#13) at the same time.
11 – Land Mines
You’ll find over 20 land mines on the road between the two points marked #11.
12 – Burke
Burke was with General Barnaky when he was captured, but he was too cowardly to do anything. The super mutants then decided to have a little sport with Burke, and so they booby-trapped him with explosives. If you disarm Burke, then you’ll gain 950 experience points. But either way, Burke will end up dying.
13 – Mutant Base
The mutant base is completely optional, but if you can kill the mutants inside, then you’ll get a lot of experience and equipment. The best way to start your attack is to drive the APC onto the trenches (#10). That will get you close enough to the base that you’ll be able to pick off some of the super mutants inside.
The main entrance to the base is located on the southern side. The ramps leading up to the entrance will be mined, and the mines will be tough (or perhaps impossible) to detect. They’ll also be neutral in the conflict. They’ll blow up if mutants step on them or if anybody from your squad steps on them. So you can try to lure mutants down the ramps so that they blow up, and you can force fire shotguns at the ramps to blow up the mines if you have to make your way across them.
Besides the mines, you’ll also encounter a trio of super mutants at the entrance, and they’ll have Browning M2s. You might be able to snipe a couple of the mutants from the safety of the APC, if you drive it up to the bridge near Burke (#12), but you probably won’t be able to hit the third mutant. Worse, that third mutant will probably be able to slaughter your entire squad if you try sending it up the ramps.
So what to do? Well, you can skirt around the main entrance and use the hidden staircase in the corner (#15). That back entrance is safer than the front entrance, but it’s not exactly safe, and you’ll probably have to do a lot of saving and loading to get your squad inside the base, and to kill the mutants you’ll find there.
14 – Chest
The chest starts out locked, but it doesn’t require a very high Lockpick skill to get it open. Inside you’ll find an XL70E3 Enfield and some ammunition.
15 – Hidden Staircase
You can use this staircase to sneak into the mutant base (#13).
Exits
The extraction point will only appear after you’ve healed Talon Squad (#9).


