This guide will help you complete the Loose Ends mission in Shadowrun: Dragonfall.
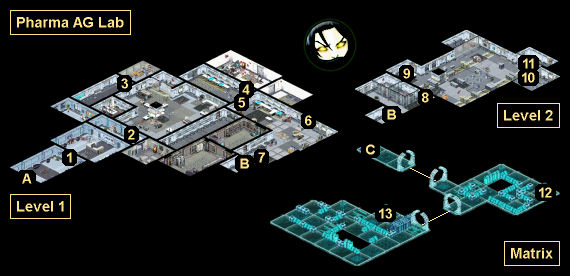
Loose Ends Map
Loose Ends Walkthrough
Background
Your client has hired you to “tie up loose ends” at a site of a botched cloak-and-dagger operation. One of the operatives from the failed mission has been captured by Knight Errant security forces, and it’s only a matter of time before he talks.
Your job is simple: kick in the door, find the operative, and put a bullet in his guts before he can spill them.
— Mission Conclusion —
Your trip back to the Kreuzbasar is an unsettling one. Every time you close your eyes, horrible visions flash through your mind. Bodies torn apart and by surgical machines. Mouths frozen open in never-ending screams. Walls coated floor-to-ceiling in congealing blood. And through it all, the smiling face of Thorvald Enstad.
You blink. Banish the visions. They’re behind you now. You’re on your way home.
Karma Points
- [3] Kill Thorvald right away (#11).
- [1] Kill Thorvald in front of the Company Men (#4).
- [8] Complete the mission.
Walkthrough
You’ll be fighting right from the start in this mission. In every major room (#1, #2, #5), you’ll encounter a handful of Knight Errant forces, plus reinforcements during the battle. You’ll also encounter a pair of auto turrets (#7). The easiest way to deal with the turrets is to use the nearby control panel (#6). With Decking 4 and Drone Control 4, you can take control of the turrets and use them against the Knight Errant forces. With Decking 3, you can simply overload the turrets and destroy them. Otherwise, you should defeat the Knight Errant forces first, and then deal with the turrets when they’re all alone.
Note: If you don’t mind rushing right at the turrets, then you can also use the control panel right next to them. It’ll give you the same options as the other panel (#6), just without the need for Decking.
When you reach the prison on Level 2 (#8), you’ll have one more major battle. You’ll start out facing a Captain, Conjurer, Grenadier and Guard, and after three turns, a Captain, Enforcer, Grenadier and Mage will storm in as reinforcements. This battle can be tough if you play it straight-up, but there are two ways to make it easier:
- You can use the Containment Cell Controls (#9) to open up the basilisk cage (#10). The two basilisks inside will then enter the fight and attack everybody — but since the Knight Errant forces will be closer, they’ll probably take the brunt of the damage. However, opening the cage will cause the reinforcements to arrive immediately and prevent you from using the next method.
- You can jack into the terminal in the room (#9) and enter the matrix (at Exit C). Once there, you’ll encounter ten White IC in total (five in each “room”), but you’ll gain access to the Security Reinforcement Door Node (#13) and a Paydata Node (#14). The former will block the northern door to the prison, preventing reinforcements from arriving. The latter will give you Paydata: Chemical Research Data, which will eventually earn you 387 nuyen.
Note: You’ll only be able to use the terminal to enter the matrix while the prison battle is going on. So be sure to hit both nodes before departing.
After the battle, when you open the cage in the northern part of the prison (#11), you’ll meet Thorvald Enstad, the rigger you’re supposed to kill. He won’t want to die, of course, so he’ll offer you a deal — namely, if you let him live, then he’ll give you a special weapon and some money. So you’ll have two ways to complete the mission:
- You can kill Thorvald. If you listen to his side of the story first — which he’ll lie about — then you won’t get any sort of extra reward. But if you immediately kill him, then you’ll earn 3 karma points, which is the best reward you can get for the mission. Then when you make your way out of the Pharma complex, you’ll run into a trio of Company Men. They’ll be surprised and impressed that you took care of Thorvald, and they’ll let you pass.
- You can let Thorvald go. For this case, you’ll need to lead him down towards the exit from the complex (Exit A). Along the way, you’ll learn that he’s a “spider,” that he’s psychotic, and that he’s the one who botched his team’s run. When you reach the operating room (#4), three Company Men will show up, and they’ll demand that you hand over Thorvald so they can complete the mission for you.
You’ll have three ways to respond. You can give up Thorvald (for no extra reward), kill Thorvald in front of the Company Men (for 1 karma point), or stick to your deal with Thorvald and attack the Company Men. Only the latter option makes any sense — for the other two, you would have been better off just killing Thorvald when you met him.
Assuming you attack the Company Men, the battle against them should go down pretty easily. Afterwards, Thorvald will enter the operating room (#4) to fetch his gear. While he’s in there, you’ll have a chance to kill him using the auto-surgeon. If Thorvald survives, then he’ll hand you a Pain Inducer (an area-effect taser) and Enstad’s Credstick before exiting the complex. Otherwise, you’ll have to loot those items from his corpse. The credstick will give you the same payment you would have received for completing the mission as intended.
Note: No matter what you end up doing with Thorvald, if he’s alive when you run into the Company Men, then your reputation will take a hit — and Paul Amsel will be disappointed in you — not that any of this will make any difference during the remainder of the campaign.
To complete the mission, you’ll just need to exit the lab (at Exit A). At that point, one of two things will happen:
- If you completed this mission after False Flag, then on your way back to the Kreuzbasar, you’ll trigger the sub-mission In Transit.
- If you completed this mission before False Flag, then when you return to the Kreuzbasar, you’ll receive a message from Paul Amsel letting you know that he has new information about Harfeld Manor. This will lead to you learning that Feuerschwinge is well funded. You’ll also receive another DVD from Maliit Holyey. The DVD will supply you with some rumors about Feuerschwinge, including that she has shed her physical form to become a “ghost dragon,” and that she has a cult worshipping her.
Back in the Kreuzbasar, you’ll receive 8 karma points for completing the mission. You’ll also earn 2500 nuyen for yourself and 7500 nuyen for your Alice fund when you check the Mission Computer in your safehouse (regardless of whether you killed Thorvald or let him go).
Mission Overview
1 – Lobby
If you jack into the terminal here, then you’ll have to fight no less than eight White IC in the matrix (in three separate battles), but you’ll then be able to take control of the security cameras in the building, which will show you some of your upcoming opposition, including the two auto turrets by the elevator (#7).
2 – Main Lab
Off to the side in this room, you’ll spot the grisly remains of a janitor.
3 – Storage Room
Inside this room, you’ll find an Advanced Medkit and Kamikaze.
4 – Operating Room
This room will start out locked, but through its windows you’ll see another mangled body. The only way you’ll be able to enter this room is if Thorvald (#11) lets you in.
5 – Maintenance Room
6 – Control Panel
7 – Auto Turrets
8 – Prison
9 – Containment Cell Controls / Terminal
10 – Basilisk Cage
11 – Thorvald Enstad
12 – Security Reinforcement Door Node
13 – Paydata Node
Exits
- Entrance.
- Elevator.
- Matrix entrance.


