This guide will help you complete The Engineer, Eiger’s companion mission in Shadowrun: Dragonfall.
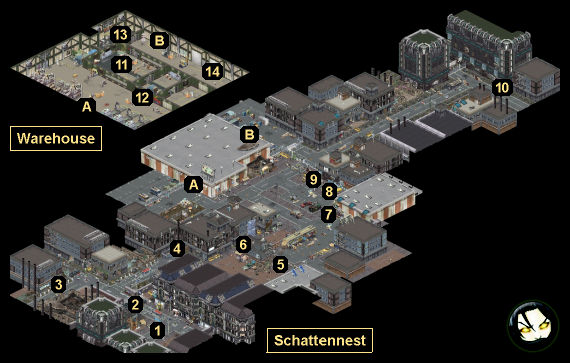
The Engineer Map
The Engineer Walkthrough
Background
Schattennest. The kiez next door to the Kreuzbasar, and an object lesson in anarchy gone wrong. Violent gangs rule the streets here, trading territory to the roar of gunfire. The streets are a warzone.
As dangerous as Schattennest already is, it could be worse. The gangs are vicious, but disorganized — they pose little risk to their neighbors. With little more than a makeshift barricade and a few volunteers, the Kreuzbasar has successfully insulated itself from the chaos of its neighboring kiez.
The Engineer could change all of that. He has to be stopped, and the F-State as a whole needs to be alerted to what his clients are trying to do. It’s up to you and Eiger to make sure that happens.
— Mission Complete —
The U-Bahn whisks you back toward the Kreuzbasar, Eiger standing by your side. The image of the Engineer’s body disintegrating in flame replays itself over and over in your mind — the bright flash, the shower of sparks, the overpowering stench of sizzling meat. A blue-green afterimage hangs suspended in the center of your field of vision, and it refuses to be blinked away.
From what Eiger told you, the Engineer was a menace. An international criminal at the top of his game. And as you watched, he was consumed from within by a device that marked him as disposable.
The rattle of your U-Bahn car coming to a halt shakes you from your reverie. You’re home.
Karma Points
Walkthrough
As you talk to Eiger in between missions, she’ll eventually tell you about Yuli Kozlov, “the Engineer,” a mercenary who paves the way for crime syndicates to take over districts. She’ll then reveal that Kozlov has been spotted nearby in Schattennest, and she’ll ask for some time off so she can deal with him. If you let Eiger go, then she’ll complete the mission on her own, and you’ll miss out on some minor rewards. If you offer to help Eiger, then she’ll ask you to go to Der Weinkeller (a bar in the Kreuzbasar) so you can talk to one of her contacts.
In Der Weinkeller, you’ll meet Eiger and her contact Bannik in a back booth. Bannik will show you where the Engineer is staying in Schattennest — in a warehouse belonging to the Rammbock gang (who you might remember from their bridge toll in False Flag) — and he’ll give you a Cyberware Deactivator so you can more easily deal with the Engineer when you run into him. After the meeting, you’ll be allowed to head out on the mission. You’ll only be able to take Eiger with you.
Note: Obviously, you’ll need to take the Cyberware Deactivator with you. You won’t be able to beat the mission without it. It’s best to put the deactivator on your main character.
Another Note: You’ll have an easier time in this mission if Eiger has a flashbang grenade. If you didn’t select the Flashbang Grenade option for her at level 3, then you should buy one for her (if needed) and have her equip it during the mission set-up phase.
You’ll start the mission in Schattennest exactly where you started in False Flag — right next to a U-Bahn entrance (#1) — and you’ll even meet the gatekeeper again (#2). As before, the gatekeeper will just wave you through.
You’ll find the Rammbock warehouse on the western side of the district (Exit A). It’ll be locked, and you’ll have three ways to get in:
- With Decking 5, you can just open the door.
- If you ask Eiger for advice, then she’ll suggest using a Propane Tank to blow open the door. You’ll find a Propane Tank on the eastern side of the district (#7). With tank in hand, you’ll be able to place it next to the door and then set it off. The explosion won’t trigger until you’ve moved far enough away from the door. This method will alert everyone inside to your arrival, which will make the first battle slightly more difficult.
- You can work out the door code. If you ask the nearby lady (#9), then she’ll offer to sell you the code for 500 nuyen. If you pay this amount (there isn’t any way around it), then she’ll only actually tell you that first three digits — 292 — but it shouldn’t take you long to figure out that the full code is 2924. You can also just “guess” that the door code is 2924 and save your money.
Inside the warehouse, you’ll have to fight your way through several Rammbock gangers. The Engineer will flee when he sees you, but you don’t have to worry about him — yet. He’ll simply wait for you until you exit from the warehouse, so you can take your time and kill the Rammbock gangers carefully.
When you exit the warehouse (at Exit B), the real chase will begin. The engineer will flee towards his motorcycle (#10), and if he makes it there, then you’ll fail the mission. So you’ll need to get close enough to him so you can use Cyberware Deactivator on him before he escapes. Whatever you do, don’t attack him. Killing the Engineer is another way to fail the mission.
The easiest way to disable the Engineer is to have Eiger immediately move as close to him as possible and throw a flashbang greande at him. That will remove his AP, which means he won’t be able to move on his next turn. That will give your main character time to sidle up to him and use the deactivator. Failing that, the Engineer will flee surprisingly slowly, and as long as you keep your main character in chase mode, you should be able to catch him.
During the chase, you’ll encounter two Rammbock gangers. They’ll try to protect the Engineer. When you disable the Engineer, they’ll charge right at you and attack. Otherwise, they’ll wait for you to run by. You’ll need to defeat the gangers before you can proceed with the mission.
With the Engineer in your custody and the area secure, you’ll take him back to the warehouse (#11), and Eiger will begin “interrogating” him. It won’t make any difference if you’re violent with him or not. Eventually, you’ll realize that there’s no way to tell which things he’s saying are true, and which aren’t. So Eiger will ask you to search the warehouse and look for clues.
You’ll find several things in the warehouse, but only three of them are important:
- Ledger (#12). When you examine the ledger, you’ll see that it’s full of addresses. When you show it to Eiger, she’ll spot a single word written in English: “Wednesday.”
- Corpse (#13). When you examine the corpse here, you’ll see that he mangled his hands and bashed in his skull — all with a smile on his face. With Biotech 4, you’ll decide that some sort of drug must have made him act that way. Eiger won’t find the corpse all that unusual.
- Courier drone (#14). The drone won’t appear to be anything special, but with Intelligence 2, you’ll see that it has an anti-tampering system. This will limit the ways that you can loot what it’s carrying:
- You can enter the password. It’s “Wednesday,” which is a word you’ll see when you show the ledger (#12) to Eiger.
- You can use Drone Control 4 followed by Drone Control 6.
- You can smash the drone open (or fail the Drone Control 6 attempt above), and then use Quickness 6. You’ll grab the drone’s contents before it can self-destruct, but you’ll take 15 damage.
If you’re successful in looting the drone, then you’ll receive a Homemade Simsense Chip. If you’re unsuccessful, then the simsense chip will get destroyed, and you won’t receive anything.
When you return to Eiger after looting (or not) the drone, one of two things will happen:
- If you didn’t get anything from the drone, then the Engineer will be infuriated that you destroyed his property. Eiger will decide that you won’t get anything else out of him,so she’ll kill him. When you examine the corpse, you’ll find a Voltaic Grenade, which Eiger will add to her mission gear.
- If you ended up with the Homemade Simsense Chip, then when you return to Eiger, the Engineer won’t be able to take his eyes off of it, and you’ll realize that he’s addicted to whatever it is. You’ll then remember the corpse in the next room (#13), and you’ll head over there to see if it was using the same chip. You’ll find a Melted Simsense Chip on him.
This time when you return, the Engineer will demand that you give him his chip, and he’ll finally reveal his employer: a shadowy group called Winternight. At this point, you’ll have to make a decision. If you withhold the chip from the Engineer, then Eiger will kill him, and she’ll end up with the Voltaic Grenade. But if you give the Engineer the chip, then he’ll tell you about his stash (in the same room) where you’ll find a Steyr AUG-CSL for Eiger, which she’ll start using as her third weapon. The Engineer will also self-destruct, so everything will end well.
When you return to the Kreuzbasar (by exiting the Warehouse at Exit A), you’ll receive 2 karma points for completing the mission.
Mission Overview
1 – Starting Point
2 – Gatekeeper
3 – Cardboard Box
If you examine the cardboard box here, then you’ll find a credstick worth 51-68 nuyen (the amount is random).
4 – Debris
Amidst the debris here, you’ll find Bliss.
5 – Rammbock Guard Post
When you approach this spot, Eiger will point out the gang members to you, and she’ll suggest looking for a way around them. This is good advice. You won’t get anything for killing the three gang members here (including a lieutenant with lots of armor), and the alley to the west (#6) will be unguarded, allowing you to walk right past them.
6 – Unguarded Alley
7 – Propane Tank
This Propane Tank will only show up if Eiger mentions it at the Warehouse entrance (Exit A).
8 – Man
The man here will complain about the district.
9 – Lady
The lady here will offer you information about the district and the warehouse — for a price. Just to get anything out of her, you’ll need to pay her 50 nuyen, or you’ll need to have the Street etiquette. For this, she’ll reveal that a “bigwig” showed up a few days ago. Then for 25 nuyen more, she’ll tell you that they’re storing drugs and guns in the warehouse, with “more drugs than guns lately.”
Finally, after examining the Warehouse entrance, the lady will offer to tell you the door code for 500 nuyen. You’ll get a Street etiquette and a Strength 5 option when negotiating, but neither one will help. The Strength option will actually kill the lady. If you pay what the lady wants, then she’ll tell you that the first three digits of the code are 292, and that you’ll have to figure out the last one on your own. The full code is 2924.
10 – Motorcycle
11 – Interrogation Site
12 – Ledger
13 – Corpse
14 – Courier Drone
Exits
- Warehouse entrance.
- Warehouse exit.


