The Warehouse – Shadowrun Returns

This guide will help you complete The South Seattle Docks and The Warehouse missions in Shadowrun Returns.

The South Seattle Docks and The Warehouse Map

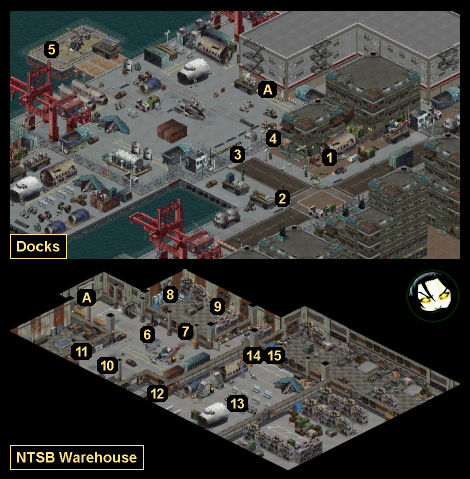
shadowrun returns south seattle docks and warehouse map
  1. Ladder
  2. Streetwalker
  3. Front Gate
  4. Fence
  5. Crates
  6. Officer Aguirre
  7. Office Door
  8. Locker
  9. Computer
  10. Crime Scene
  11. Bunkroom
  12. Warehouse Door
  13. Shoe Pile
  14. Refuse Pile
  15. Warehouse Door

The South Seattle Docks and The Warehouse Walkthrough

Background: The South Seattle Docks

Leaving the Seamstresses Union behind, you head to the docks. The Ripper killed Sam, and maybe he or she slipped up with this latest victim, left some useful evidence. Only one way to find out.

South Seattle’s your typical industrial area: grit, grime, and grey. The rain doesn’t help matters any. Layers of dirt mix with abandoned wooden pallets, repurposed into makeshift furniture for the day workers. Garbage collects in the gutters of the broken down street. “Disreputable” is this district’s middle name.

Your destination, the National Transportation Safety Board warehouse, is located on a small strip of dock towards the less-maintained end of the waterfront. Despite the presence of those who linger in such places, it’s quiet as you approach the gate.

Background: The Warehouse

Inside, the large, grey warehouse is as typical as the outside. High ceilings, adorned with girders and rickety catwalks, top a huge utilitarian room. Concrete and steel walls meet a concrete floor. This is a place for storing things, and nothing more.

Despite the quiet on the outside, the inside is a hornet’s nest of Lone Star officers going about their business. In the center of the activity is the Emerald City Ripper’s latest victim. With uniforms everywhere, no one stops you at the door. It seems this case hasn’t leaked to the press — yet.

Lone Star or no, you’ve got a job to do….

Karma Points

  • [3]  Get past the Lonestar Guard at the front gate (#3).
  • [5]  Give Shannon (#10) enough items to contact the spirits in the warehouse.

Walkthrough

When you approach the front gate of the warehouse (#3), you’ll be stopped by a Lonestar Guard. If you have the Security etiquette, then he’ll allow you to pass. Otherwise, he won’t. To sneak past the guard, you’ll need to hire the streetwalker (#2) to distract him, and then use the ladder (#1) to climb over the fence (#4). The streetwalker will cost you 20 nuyen, but you’ll be able to take the ladder for free if you threaten the homeless man standing next to it (or charm him with Charisma 3). Getting past the gate guard will earn you 3 karma points.

Note: You won’t be able to hire the streetwalker or pick up the ladder until after you’ve spoken to the gate guard.

Inside the warehouse (Exit A), you’ll run into Officer Aguirre (#6). He’ll tell you that the victim was an investigator for the NTSB, and that he was apparently selling secrets to the highest bidder — which might be the real reason for his murder, rather than being a target of the Ripper. Aguirre will then give you a key so you can open some of the locked doors in the warehouse (#7 and #12).

Inside the victim’s office, you’ll find a computer. If you paid money to Aguirre during the Pike Place Market mission, then you’ll be able to read the files on the computer right away. Otherwise, you’ll need Decking 4 to read them. If you’re able to read the files, then you’ll discover some Incriminating Data, which you’ll be able to sell later to Van Graas at the Union.

When you head over to the crime scene (#10), you’ll find Dresden there. He’ll tell you that the victim is missing his lungs, plus some other organs, but that the surgery wasn’t as clean as with the other victims. He’ll also mention that the lungs were transplants, which was also the case for the victim who lost a heart. You might remember that Blind Mary’s eyes were transplants as well.

Next to the crime scene, you’ll meet Shannon Half-Sky, the victim’s sister. You’ll learn that she’s a shaman, but that she hasn’t had any luck contacting her brother’s spirit. However, she’ll reveal that the spirits of several plane crash victims are trapped in the warehouse, and that she might have better luck contacting them, provided you can find some of their belongings.

There are four “haunted” items that you can pick up:

  • Comb. You’ll find it in the locker in the victim’s office (#8).
  • Old Diary. You’ll find it in the bunkroom (#11). To enter the bunkroom, you’ll need to use Drone Control or Spirit Summoning to open a door (#15), behind which you’ll find a Magnetic Screwdriver. The screwdriver will allow you to access the panel next to the bunkroom and open the door.
  • Sneaker. You’ll find it in a shoe pile (#13), but only if you have at least Intelligence 3.
  • Steel Earring. You’ll find it is a refuse pile (#14).

When you hand at least two of the items to Shannon, she’ll start communicating with the spirits — but right then Detective McKlusky will show up, and he’ll evict you from the crime scene. You and Shannon will then decide to come back later when the police are gone, and Shannon will give you 4000 nuyen so you can hire some backup (at the Union). You’ll also earn 5 karma points.

When you leave the warehouse (via Exit A), you’ll get a call from Coyote. She’ll tell that she’s trying to rescue her cousin Gino from a BTL lab, and that she could use your help. This is an optional mission, but it’s worth completing.

Missions Overview

1 – Ladder

2 – Streetwalker

3 – Front Gate

4 – Fence

5 – Crates

Next to the helicopter here, you’ll discover two crates containing a Fichetti Concussion Grenade and a Phosphorus Grenade.

6 – Officer Aguirre

7- Office Door

You’ll only be able to open this door after talking to Aguirre (#6).

8 – Locker

9 – Computer

10 – Crime Scene

11 – Bunkroom

12 – Warehouse Door

You’ll only be able to open this door after talking to Aguirre (#6).

13 – Shoe Pile

14 – Refuse Pile

Along with the Steel Earring here, you’ll find a credstick worth 200 nuyen.

15 – Warehouse Door

You’ll only be able to open this door by using Drone Control or Spirit Summoning. In the room beyond, you’ll find a Magnetic Screwdriver, which you’ll need in order to enter the bunkroom (#11).

Exits

  1. Warehouse entrance.
Share this guide:
Val Hull
Val Hull

Resident role-playing RPG game expert. Knows where trolls and paladins come from. You must fight for your right to gather your party before venturing forth.

Articles: 10020

Leave a Reply

Your email address will not be published. Required fields are marked *