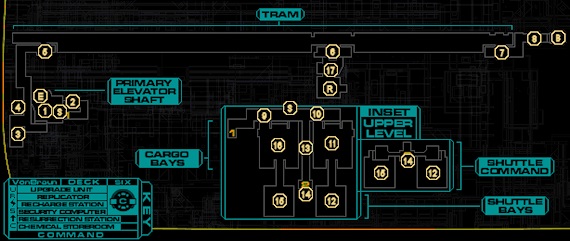
This guide is a walkthrough for a certain area aboard the Von Braun. You can see a map of the respective location and its points of interest, along with a map legend to identify each point. The points are in order and further explained in the “Walkthrough” section below.
Walkthrough
1 – Tram Lobby
As you step out of the Elevator, SHODAN will contact you and tell you her plan to deal with the Many involves blowing things up – namely, the Von Braun itself. Thankfully, the plan also includes your escape. Stage one of the plan involves you retrieving a keycard from the bridge of the Von Braun, so that’s where you’re headed.
Check the left as you come into the lobby for a Cyborg Assassin lurking in the shadows, and be aware of a Security Camera on the ceiling near the south door. Search the two corpses for a Speed Booster, AP Bullets, 49 Nanites and a Medical Kit. A Maintenance Tool also rests on the floor in plain sight, while a Soda can be found behind the sole column if you need it. Last, there’s some Cigarettes and Vodka on the bench.
2 – Security Door
You’ll find this door to be sealed off initially (and no, hacking the nearby Security Control Station doesn’t help).
When you return from Engineering A after giving SHODAN access to the Von Braun’s self-destruct sequence, she’ll explain to you that the Many sense your intentions, and are trying to escape on the shuttlecraft. You now have the additional goal of destroying all of the remaining shuttles, save your own. Fun! Continue through the door and up the ramp.
3 – Upgrade Units
Two Annelid Arachnids will come down the hallway towards you as you arrive from the Tram Lobby (1), the Many’s voice ringing in your head. Check this small room for two Upgrade Units (Stats and Psi). On the floor you’ll find an Audio Log, and the corpse has some Standard Bullets and a good-quality Pistol on it. Last, search the garbage can for 7 Cyber Modules.
4 – Recharging Station
This handy Recharging Station is in plain sight as you come down the hallway.
5 – Tram Station 1 & Replicator
Yet more corpses litter the floor in here, and the Many will again taunt you as you explore the room. Before boarding the tram, there’s quite a lot of loot to be found: some Proximity Grenades, 20 Nanites and a Crystal Shard on the corpses, 3 Cyber Modules and some Chips in the garbage can, and 2 Chips, 2 Vodka, and some Anti-Personnel Bullets in the broken Replicator. The working Replicator will sell you Vodka, Psi Hypos, Anti-Toxin Hypos, and Standard Bullets; hack it to purchase AP Bullets instead.
Step into the tram and hit the switch to ride the rails down to Tram Station C (6).
6 – Tram Station 2
Two Laser Turrets will attack you as you ride into the station, so duck behind the tram’s walls and take them out before stepping onto the platform. You’ll find an Audio Log on one of the benches. The elevator on the west side of the platform will take you to the upper floor, where a couple of Swarm Pods await you. Destroy them, then loot the body for 4 Cyber Modules, and hack the secure crate for a Laser Pistol. There’s a Psi Booster across the tracks, on top of a pipe, but you’ll only be able to get it provided you have Psi Pull.
You won’t be able to initially go through the secure door, so board the tram again and continue to the next station.
7 – Tram Station 3
A Protocol Droid will attempt to “help” you as you arrive; kindly reject its offer, then grab the Audio Log from the floor, which gives you some useful information about an upcoming threat.
8 – Hallway & Cyber Modules
As you proceed down the hallway, you’ll be contacted by Delacroix, who is apparently still alive. She’s holed up in Cargo Bay A, and needs your help. Before continuing on to Command Sector B (yes, it was a rather short stay, but we’ll be back), check behind the large crate on the floor for 6 Cyber Modules.
9 – Rumber, Swarm Pod & Missile Turret
Not only will you encounter a Rumbler as you come up the ramp, you’ll find a Swarm Pod near a grate on the wall, and Missile Turret down the hallway. Best deal with them one-by-one with whatever means you have available. When the Rumbler’s dead, destroy the Swarmp Pod, then finally the Missile Turret. When they’re gone, pick up the Audio Log from the floor nearby and continue forward.
10 – Hallway
As you proceed past the first Shuttle Bay, keep an eye out for a Security Camera and Grub Pod on the left wall. Destroy both of them, then take the Standard Bullets and the perfect Pistol from the corpse.
11 – Shuttle Bay 2
Use caution as you open the Shuttle Bay. You’ll instantly be attacked by a Missile Turret on the balcony, and a Cyborg Midwife will shoot you from afar. Avoid running into get her – you’ll stumble into range of two more Missile Turrets, one on each side of the room, and instead take them all out one at a time from a distance. Clear out the scattered Grub and Swarm Pods from the room before exploring too much.
Time for some looting. You’ll find a semi-hidden storage container behind a large crate with some Version 3 Repair Software and an Auto-Repair Unit inside, as well as a locked storage crate with Version 3 Research Software inside. Check the small red and white storage crate for a Speed Booster and Anti-Toxin Hypo. Take the Grav Shaft up and you’ll find another locked crate with an Anti-Radiation Hypo, some Rifled Slugs, and 42 Nanites, plus an Audio Log sitting on the floor nearby. Make your way around to the small nook around back, and you’ll also find a corpse with some Standard Bullets and Rifled Slugs on him. When you’re finished, proceed forward into the Shuttle Bay 2 Hangar (12).
12 – Shuttle Bay 2 Hangar
The shuttle awaits you, guarded by a Swarm Pod and Cyborg Assassin. After they’re dealt with, you’ll notice the shuttle is guarded by a force field. You can’t damage the generator, so instead take the ladder in the corner of the room up one floor. To get in the door at the top, you’ll need the Shuttle Bay Access Card back in Command B, so make sure you’ve got it.
When the door’s open, use the Shuttle Control Console to lower the shuttle’s shields, then fire a few rounds at it (or simply hit it a few times with your Wrench) to render it inoperable. It’s a miracle these things can even survive takeoff at this rate. Before leaving, grab a French-Epstein Device from the windowsill.
13 – Shuttle Command Access
Coming down this hallway, you’ll spot a Security Bot at the end. It won’t attack you from a long range, so use that to your advantage and fire at it from the very end of the hallway. Float up the Grav Shaft to find yourself at Shuttle Command (14).
On your way back after destroying the shuttles, several Hybrids will charge you in this hallway. They’re little threat, but it looks like the Many is sending everything it has to stop you.
14 – Shuttle Command & Replicator
At the top of the Grav Shaft, you’ll find a Grub Pod and a Replicator, which is selling Vodka, Fragmentation Grenades, Incendiary Grenades, and Maintenance Tools, and can be hacked for EMP Grenades.
If you haven’t yet deactivated the shields in Shuttle Bay 2, do so now, then check the controls for Shuttle Bay 1, and… hey, get away! Damn, the Cyborg Midwife has destroyed the Shuttle Control Console. Well, that complicates matters. SHODAN will give you 20 Cyber Modules, and tell you to use the Replicator nearby to create a Sympathetic Resonator. Conveniently, there’s also a corpse in this room with some Version 3 Hacking Software on it. You should have more than enough hacking skill to get the job done, but if you don’t, you’ll need to backtrack to find an Upgrade Unit and give yourself the necessary improvements.
15 – Shuttle Bay 1 Hangar
Once you’ve hacked the Replicator and created the Symphonic Resonator, hop down to the Shuttle Bay and attach the Resonator to the Shield Generator, then get up the ladder as fast as you can and watch the fireworks. SHODAN congratulates you, in her back-handed way, and tells you to get to the umbilical to escape the Von Braun for good. Remember Tram Station 2 at (6), and its locked door? That’s where you need to go… but first, take advantage of the destruction, and step through the ruined door to Shuttle Bay 1.
16 – Shuttle Bay 1
SHODAN will warn (threaten?) you against going into Shuttle Bay 1, urging you instead to head to the umbilical. What could possibly go wrong by entering? A Cyborg Midwife will attack from the left as you step in, for one, with another on the balcony above. You’ll also want to destroy a few Grub Pods lying about.
There’s little of value on the balcony, but on the main floor, you’ll find a storage crate with an Anti-Radiation Hypo… and a corpse, whose Audio Log reveals to be Delacroix. Delacroix was betrayed by SHODAN, from the sound of it, and SHODAN has plans extending far beyond the immediate threat of the Many. Grab the Psi Hypo and 10 Cyber Modules from her body, but as you exit, SHODAN, angry at your disobedience, will take those Cyber Modules away from you. Easy come, easy go. Still, from the sound of it, you might have a new enemy to deal with in the future.
When you’re finished here, backtrack to Tram Station 2 at (6), and get ready to leave the Von Braun behind for good.
17 – Umbilical Access & Barrier
As you arrive to exit on the umbilical, Korenchkin will contact you and inform you that he has put up a psychic barrier to prevent you from leaving the Von Braun. It’s always something, isn’t it? He tells you to meet him on the Bridge to “discuss your future”… sounds like a trap, but you have little choice at this point. Beware of the Annelid Arachnid that attacks you from the shadows, and loot the corpse for a Medical Kit, Anti-Toxin Hypo, and some AP Bullets on your way out.
After killing the Psi Reaver on the Bridge in Command B, the barrier will be gone. SHODAN will give you 30 Cyber Modules for your success. There’s an Audio Log on the floor, featuring Norris, and a working(!) Surgical Unit to the left, so take the opportunity to heal up. When you’re ready, take the Grav Shaft up to the Rickenbacker Pod – don’t worry, you’ll be able to return to the Von Braun, at least for a little while longer.
B – Transition to Command Sector B
E – Elevator
R – Transition to Rickenbacker Pod 1
S – Security Control Stations


