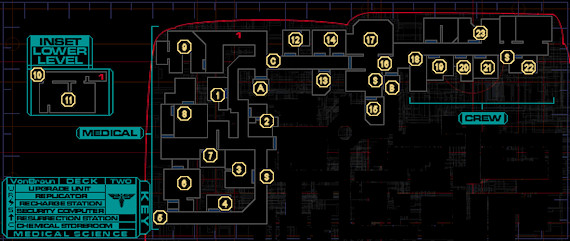
This guide is a walkthrough for a certain area aboard the Von Braun. You can see a map of the respective location and its points of interest, along with a map legend to identify each point. The points are in order and further explained in the “Walkthrough” section below.
Walkthrough
1 – Bio-Reconstruction Device & Surgical Unit
This room will be your best friend on this side of MedSci. Inside you’ll find a Bio-Reconstruction Device (remember to activate it to avoid perma-death) and a Surgical Unit, which will fully heal all your wounds for a small Nanite fee. Very useful. Note that while this Surgical Bay is functional, you’ll find others around the ship that aren’t; you’ll need to use Surgical Unit Activation Keys – of which there are a limited number – to get them up and running.
2 – Storage Room
Here you’ll find a corpse containing a Medical Hypo, and a hackable storage crate with some Standard Bullets inside. Note that the Security Camera in the hall will be able to see you through the glass, so be careful to avoid setting off the alarm.
3 – Irradiated Room
Outside this room, you’ll be contacted by Dr. Polito about how you may start seeing ghosts (yeah, a bit late there, lady), and she’ll explain that your implants are to blame. You may also hear or be attacked by some Monkeys as you explore this part of the level, as well, so be on guard.
If you’ve got a few Anti-Radiation Hypos, you should be fine exploring it. Inside you’ll find an Audio Log in the desk, as well as a hackable security crate containing a Psi Hypo, Anti-Radiation Hypo, and 23 Nanites.
4 – Storage Room
Outside this room you’ll be attacked by a couple of Hybrids, so be prepared. Inside, there’s a storage crate with a Psi Hypo and a corpse with Version 1 Research Softawre, and some Light Combat Armor, which will shave off 20% of the damage you take. Nice!
5 – Turret
Another turret blocks the entrance to Biopsy. Hide behind the pillar and take pot shots at it, preferably with AP ammo, until it goes down.
6 – Biopsy
There’s a Security Camera in this room, so take it out quickly before exploring around. You’ll hear a strange voice, or rather, collection of voices, speaking about the glory of unity or some such. More ghosts? Maybe…
Search the desk near the door for a Medical Hypo, and climb the ladder to find a couple of storage containers with a Psi Hypo and 20 Nanites, as well as a hackable storage crate containing a poor-quality Pistol and 28 Nanites.
On the bottom floor you’ll find what you came here for – the Deck 2 Crew Quarters Access Card – as well as a Medical Hypo and an Audio Log nearby. Polito will radio in and transfer you 5 Cyber Modules for your efforts.
7 – Personal Quarters
Outside the door, you’ll run into another ghostly apparation. Check inside for 7 Nanites on the corpse, and an Audio Log.
8 – Irradiated Room & Decontamination Shower
Another room full of radiation. In here you’ll find an Audio Log and Anti-Radiation Hypo on the counter, and in the back room, an Anti-Radiation Hypo and 26 Nanites in a couple of storage containers, and 2 Cyber Modules on a corpse.
Note that the deconamination shower here does in fact remove radiation, so if you find yourself heavily irradiated and don’t want to use an Anti-Radiation Hypo, you might be able to run here in time.
9 – Lab
On the upper floor here, you’ll be contacted by Xerxes, where he’ll question your motives and goals. Search around and you’ll find a Version 1 Research Software and Audio Log in a desk, and just next to it a Surgical Unit Activation Key. Plug this thing into any inoperative Surgical Unit and you’ll have an instant-healing station ready to use. I don’t recommend using it on this deck, though, as the Acivation Keys are limited and there’s already two working Surigical Units in this area, at (1) and (11). Be sure to grab the pack of 10 Nanites sitting on a ledge as you exit the room – you can jump to it from the catwalk.
10 – Turret
Be careful as you enter the Lab Lower Level (11), as there’s a Turret right outside the entrance. Standard procedure applies – duck behind cover and take pot shots until it’s down.
11 – Lab Lower Level & Surgical Unit
As you come through the door, some Monkeys will break out of their holding pens and attack you. Dispose of them, but be careful to not draw the fire of the Turret at (10) if you haven’t destroyed it yet. There’s a working Surgical Unit in this room, if you need to heal yourself after – or during – the fight.
When the Monkeys are dead, you’ll be able to scavange the room. The storage containers near the Monkey cages contain a couple of Medical Hypos. On the other side of the room, check the desk for an Audio Log, and search its drawers for a Psi Hypo. One of the corpses on the floor holds a Psi Amplifier and, more importantly, 2 Cyber Modules.
12 – Bedroom
Search this bedroom for a box of Standard Bullets on a shelf, and an Audio Log in the desk.
13 – Lounge & Replicator
In here, you’ll find a whole bunch of food items scattered around, and a Replicator selling Cigarettes, Fragmentation Grenade Clips, Psi Hypos and Rifled Slugs. You can hack the Replicator for Version 1 Research Software, but you likely have that already. Last, there’s a Grenade Launcher hidden in a compartment under the counter, though it’s broken. If you like, hang on to it until you’ve got the necessary skill to repair it.
14 – Ruined Bedrooms
Only the door on the right will open properly. There’s not much to find inside, except for a box of Rifled Slugs in an overturned desk.
15 – Security Station & Armory
You’ll find a Security Control Station here, as well as an Audio Log explaining that the password to the door was changed by someone up on Deck 4, which you’ll later be able to find. If you want to skip the wait and open the door now, the code is 98383. Doing so, however, gives you access to some extremely powerful weapons much earlier than the game is balanced for, so do so at your own discretion.
Inside, you’ll find an Assault Rifle and Standard Combat Armor on the floor, an EMP Rifle and Stasis Field Generator on the bench, some Fragmentation Grenades on the corpse, some alcohol next to the corpse, two Portable Batteries in one storage crate, and some Anti-Personnel Bullets and two Medical Kits in the other. You’ll be lucky to be able to even carry all this stuff, but the Assault Rifle is one of the best guns in the game and a definite keeper, if you have the skill to use it.
16 – O/S Upgrade Unit
Here you’ll come across a wall-mounted O/S Upgrade Unit. O/S Upgrade Units will impart a wide variety of passive upgrades to your character, but you’ll be limited to four upgrades duirng the entire game – and try not to mis-click, as there’s no confirmation button when you select an option on the Upgrade Unit.
Think very carefully about the O/S Upgrade you want, as it will help define your character. Early in the game, some of the better choices are Sharpshooter (15% damage bonus with ranged weapons), and Lethal Weapon (35% damage bonus with melee weapons), whereas others, like Tank (+5 hit points) border on useless. See our O/S Upgrades page for details on making your choices.
17 – Lounge & Upgrade Units
You’ll find several miscellaneous food items scattered around the area if you need some healing help, but more importantly there’s some Upgrade Units as well – two on the bottom floor and two up the stairs. Now’s a good time to spend the Cyber Modules you’ve accumulated while exploring MedSci.
18 – Crew Quarters & Storage Room
As you enter the Crew Quarters proper, you’ll be attacked by a Hyrid or two, and be aware that there are two Security Cameras – one at the very end of the hall and one behind a pillar halfway along the walkway. At the very end of the hallway, there’s a pack of 20 Nanites waiting for you. For those of you who specialise in Psi, there’s a terrible-quality Pistol on the ledge near the Security Camera that you’ll only be able to take with Kinetic Redirection, i.e. Psi Pull, though if you’re really nimble you might be able to jump and grab it.
Inside the storage room to your right as you enter, you’ll find some Chips, though little else of interest.
19 – Bedroom & Security Field
There’s a hackable storage crate in here containing an Anti-Radiation Hypo, and the desk has some Proximity Grenades in its drawers. More interesting is the force field – you’ll need to hack the terminal on the wall opposite in order to get through. Inside, there’s a Security Camera, so tread lightly. The rewards aren’t all that great, though – some Light Combat Armor, which you likely found earlier, a bottle of Champagne and a Medical Kit.
20 – Bedroom
Nothing of importance here, except for some Cigarettes if you really want them.
21 – Bathroom & Pile of Worms
This bathroom is unremarkable save for the pile of worms in one of the stalls. Ew… don’t touch them or you’ll take damage. Much later in the game, you’ll be able to use a Small or Large Beaker with these worms in order to receive Worm Clusters.
22 – Office of Dr. James Watts
Dr. Watts, predictably, isn’t home, but there’s an R&D Access Card and an MFD Game Player in the desk. You’ll receive a transmission from Dr. Polito upon taking the keycard, who will send you 5 Cyber Modules as a reward for your progress. Time to head to R&D and find Watts! Backtrack to the Science side of MedSci, and head towards the R&D sector to find him.
23 – Crawlspace & Flooded Rooms
There’s a ladder in one of the flooded rooms here that leads up to a crawlspace area, with 20 Nanites on the remains of the ceiling and 4 Cyber Modules on a corpse in the back room, near some pumps. You’ll have to jump around a bit to reach them.
As for the rest of the loot in the area: there’s 10 Nanites on a corpse in one of the bedrooms, a BrawnBoost(TM) Implant in a wastebin inside the flooded bathroom, an Audio Log and Psi Hypo inside another bedroom, a box of Standard Bullets on a corpse in the hallway, and, inside the last bedroom on your way out, another Audio Log.
A – Transition to MedSci Science Sector
B – Transition to MedSci Science Sector
C – Door to Crew Quarters
You’ll need the Deck 2 Crew Quarters Access Card located at Biopsy (6) to pass through this door.
S – Security Control Stations
Use these to deactivate any alarms you may set off.


